Pages

Showing posts with label Limited Supplies Challenge. Show all posts

Saturday, August 22, 2009

...Team Edward

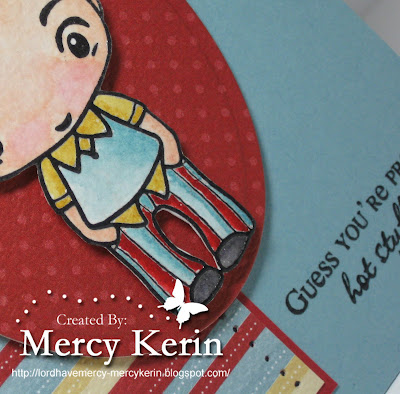
I am pretty sure that every woman in the world knows what I am talking about! One of the sexiest and most romantic vampires in history, Edward Cullen has captured the hearts and necks of women all over the world! LOL! I was so thrilled when I saw that The Greeting Farm had an Edward stamp...is he not adorable?!? I paired this wonderful stamp with a sentiment from an older Verve set Great Expectations, and it states "guess you're pretty hot stuff now". In my book, the answer is a resounding OH YEAH!

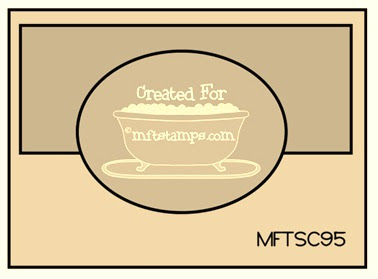
I used this week's My Favorite Things Sketch Challenge #95 as a starting point, but I flipped the sketch 90 degrees to the left to accommodate the large image. I also used the Limited Supplies Challenge #234, which was to create a masculine card with no flowers, no ribbon, and no bling...yes....NO BLING! Since I couldn't use any blingage I decided to pierce around the vertical striped panel with a Mat Pack and Paper Piercer. The patterned paper was from the retired Slumber Party Designer Series Paper pack, and I cut the patterned paper oval out using my Big Shot and Spellbinders' Classic Oval Nesties.

That's it for today! Thanks for stopping by, and I will see you back here tomorrow with a couple of cards and/or projects. Until then...
Supplies
Stamps: Edward (The Greeting Farm), Great Expectations (Verve)
Papers: Baja Breeze, Riding Hood Red, Watercolor, Slumber Party DSP
Inks: Basic Black Craft, So Saffron, Riding Hood Red, Baja Breeze, Blush Blossom, Cameo Coral, Close to Cocoa, Soft Suede, Basic Gray
Accessories: clear embossing powder, heat gun, mat pack, paper piercer, dimensionals, aquapainter, big shot, nesties

Friday, January 30, 2009

...Three Cards for Three Challenges

I've been pulling double duty today! Not only have I played with some of my new stuff, but I've also gotten alot of challenges taken care of, too! I spent the day stamping at Lakesha and Robin's house, so there was quite a bit of laughing and goofing off in the process! :) Love you, ladies! Since there are three cards today, I will be not be sharing the exact details, but I will include a supply list under each one for you. Here we go!

This is my submission for today's Limited Supplies Challenge #205...Clean And Simple (CAS).
Supplies
Stamps: Bird on a Branch
Papers: Whisper White, Pacific Point, Garden Green
Inks: Chocolate Chip, Garden Green, Pacific Point
Accessories: scor-pal, mat pack, paper piercer, 5/8" pacific point striped grosgrain ribbon, dimensionals, scissors, horizontal slot punch
This is my submission for Amy Rysavy's Friday Sketch #47 (AMYRS56)
Supplies
Stamps: Comfort Food (hostess set), Really Retro (sentiment)
Papers: Kraft, Basic Black, Whisper White, Watercolor, Riding Hood Red DSP
Inks: Jet Black Staz-On, Riding Hood Red, So Saffron
Accessories: aquapainter, scissors, classic rectangle nesties, big shot/accessories, dimensionals, silver brads, 1/4" circle punch, so saffron striped grosgrain ribbon, SAMJ, image sheet, mat pack, paper piercer
And last...but certainly not least, this is my submission for Julee Tilman's MojoMonday Sketch #71
Supplies
Stamps: Friends 24-7
Papers: Baja Breeze, Chocolate Chip, Whisper White, Vellum, Parisian Breeze Specialty DSP {LOVE IT!}
Inks: Baja Breeze, Chocolate Chip (Classic & Craft)
Accessories: sponge, mat pack, paper piercer, dimensionals, grosgrain ribbon (non-SU), silver cording, horizontal slot punch, 1-1/4" circle punch, 1-3/8" circle punch, eyelet border punch {LOVE IT, TOO}, embossing buddy, clear embossing powder, heat gun


That's it for today...thanks for stopping by! I have some stamping time planned with Pam tomorrow, so I should have more cards for you to drool over later! Until then...

Friday, November 21, 2008

...Limited Supplies Chalenge #195


This was my submission for today's Limited Supplies Challenge at SCS. My sweet online friend, Judy (aka StampingQueen JAR) was our guest host this week. Here were the rules:
  • Our creation must have some sort of chocolate theme, either with color, stamp and ink choices, or embellishments
  • We could use any stamps
  • We had to use at least one shade of chocolate cardstock/ink, plus any others
  • We could embellish however we wanted
  • We could use any tools
So this was what I came up with! I used Chocolate Chip Cardstock as mats for each layer along with the following: Lovely Lilac Cardstock, Kiwi Kiss Cardstock, Whisper White Cardstock, and Bella Rose Designer Series Paper (DSP). The flowers were from the set "Eastern Blooms", and were stamped in Lovely Lilac Classic Ink onto the white paper. I added some piercing around each bloom using the Floral Frenzy Brass Template and a Paper Piercer. I placed a Mini Glue Dot in the center of each flower, then sprinkled some Silver Metallic Mini Beads over them to create the *sparkly* centers. The kiwi designer paper was pierced around all four edges using a Mat Pack and Paper Piercer, then the sentiment (from "Elegant Cheer") was stamped in Chocolate Chip Craft Ink. Clear Embossing Powder was sprinkled over the craft ink, then embossed using a Heat Gun. I punched three circles out of a scrap piece of lilac cardstock with the 1/4" Circle Punch, then put Silver Brads through the centers of each before I added them to the patterned paper panel. I dry embossed the square kiwi panel with the same brass template I used for the piercing around the flowers, a Light Table, and Empressor Stylus. A piece of 5/8" Chocolate Chip Grosgrain Ribbon was added around the DSP panel, then each layer was raised from the lilac card base using Dimensionals.

That's is it for today! I hope to have something for the Inspiration Challenge at SCS and Beate's Sketch Challenge tomorrow. So until then....


Supplies
Stamps: Eastern Blooms, Elegant Cheer
Papers: Lovely Lilac, Chocolate Chip, Kiwi Kiss, Whisper White, Bella Rose DSP
Inks: Lovely Lilac, Chocolate Chip-Craft
Accessories: mini glue dots, mini beads, brads, ribbon, dimensionals, clear ep, heat gun, embossing buddy, mat pack, paper piercer, 1/4" circle punch, brass template, light table, empressor stylus, stamp-a-ma-jig, image sheet

Friday, October 31, 2008

...Contemporary Brocade Butterflies

HAPPY HALLOWEEN, EVERYONE! I will not be able to enjoy the Halloween festivities in my neighborhood this year. I will be working the concession stand at the LFO-SE Whitfield football game...fun, fun! I also have a ton of work to do today, so I am sharing this card with you early.

This is my submission for today's Limited Supplies Challenge #192 at SCS. We were to use a stamp(s) in a way different from what it was originally intended..."Stamps In Disguise". I used the curly "s" images and the leaf blossom from the set "Brocade Basics" to create these contemporary butterflies. The bodies were made by coloring one of the S's with a Chocolate Chip Stampin' Write Marker. The wings were stamped with the following: Tangerine Tango Classic Ink, Kiwi Kiss Classic Ink, and Bashful Blue Classic Ink. I made a little eye for each using the White Signo Gel Pen, then covered the wings with Icicle Stickles for some shimmer.

The sentiment was from the set "Kindred Spirits", and it was stamped in Chocolate Chip Classic Ink. I received my large order from Stampin' Up yesterday, so I just had to play with my new Frosty Day Designer Series Paper...LOVE IT! Some of the embellishments used to complete this card include some 5/8" Kiwi Kiss Striped Ribbon, and brads from the Sterling Silver HodgePodge Hardware container.

That's it for today! Thanks for stopping by this morning, and I hope to see you all again tomorrow. I will be working on getting supplies and samples ready for my upcoming clubs, so I will be very busy. I will try my best to post something over the weekend, though. Until then...


Supplies:
Stamps: Brocade Basics. Kindred Spirits
Papers: Kiwi Kiss, Whisper White, Chocolate Chip, Whisper White Textured, Frosty Day DSP
Inks: Chocolate Chip, Tangerine Tango, Kiwi Kiss, Bashful Blue
Accessories: HPH, stickles, stamp-a-ma-jig, image sheet, ribbon, dimensionals, signo gel pen

Friday, October 24, 2008

...I Couldn't Sleep

...so I decided to make a submission for today's Limited Supplies Challenge #191 at SCS. We were to use a leaf/leaves in our card creation along with the color pink somewhere on the card. I used the leaf from "Autumn Harvest" again {I love it!} along with these following stamp sets: "Canvas", "Thanksgiving Blessings" (retired), and "Holidays & Wishes". The colors on this one were Pink Pirouette, Riding Hood Red, Basic Black, and Whisper White.

Supplies
Stamps: Autumn Harvest, Canvas, Thanksgiving Blessings, Holidays & Wishes
Papers: Pink Pirouette, Riding Hood Red, Watercolor
Inks: Jet Black Staz-On, Riding Hood Red, Regal Rose
Accessories: brads, stamp-a-ma-jig, image sheet, ribbon, mat pack, paper piercer, black marker, dimensionals, sponge dauber, aquapainter

That's it for today...I think I've said that before! LOL! I will try to make a card for tomorrow's Inspiration Challenge...maybe I can combine it with Beate's Weekend Sketch {fingers crossed}...wish me luck! I have a king-size bed calling my name, so I am off to catch some Zs. Until tomorrow...


Friday, October 10, 2008

...Kindred Spirits (SC90 & LSC183)

This is my submission for a couple of challenges at SCS: Sketch Challenge #90 and Limited Supplies Challenge #183. The LSC for that week was called "A Little Something". We were to create a card using the following:
  • Something Old (brads)
  • Something New (designer papers)
  • Something Borrowed (chipboard...thanks, Janet!)
  • Something Blue (cardstock colors)
As you recall, I attended a Stamping Retreat with a few of my close friends and fellow-demos just last month. I was trying to catch up on several challenges that I hadn't been able to complete, and this card was one of them. I like to combine challenges as much as possible...they seem to dwindle down alot quicker if you do it that way! LOL!

I used chipboard, buttons, brads, rhinestones, and a crimper to create all of the embellishments on this card...I don't think I've ever used that many before! The flowers were cut from the Urban Garden Designer Series Paper pack, while the striped background piece was from the Maine Blueberry Designer Series Paper pack. The sentiment was from the set "Kindred Spirits", and was stamped in Not Quite Navy Classic Ink onto Whisper White Cardstock. It was then mounted onto a piece of Not Quite Navy Cardstock, run through a Crimper, then the end was cut to resemble a banner using CutterBee Scissors. The chipboard was painted using a Not Quite Navy Craft Spot, but it had to dry for a long time before I could actually put the entire card together...that's the only thing I don't like about craft ink. The card base (Baja Breeze Cardstock) was stamped with the "Canvas" background stamp in Baja Breeze Classic Ink.

That's it for today! I am headed to check on Mom, then going to a friend's house to get some more stamping done. I have to work on some tags for my upcoming club, so I'd better get on it! Until later...


Supplies
Stamps: Kindred Spirits, Canvas BG
Papers: Baja Breeze, Kiwi Kiss, Maine Blueberry DSP, Urban Garden DSP, Whisper White, Not Quite Navy
Inks: Not Quite Navy (Classic & Craft)
Accessories: Chipboard, Not Quite Navy Brads, Button Bouquet, Clear Rhinestone, Crimper, Scissors, Dimensionals

Friday, June 27, 2008

...Limited Supplies Challenge #174

DON'T FORGET TO ENTER TO WIN BLOG CANDY IN THE POST BELOW!

This was my submission for today's Limited Supplies Challenge at SCS ~ Brads Are NOT the Pits! Here were the rules:
  • Use a brad (or SOME brads) as the ONLY embellishment on your creation
  • The brad has to be incorporated INTO the stamped image, not just an accent
  • No ribbon, other hardware, primas, stickles, etc. allowed!!
  • Focus on the stamped image using the brads to make it POP
  • Limit layers if possible

I started with a Lovely Lilac Cardstock base measuring 6-5/8 X 3-1/4. The focal panel was made of Basic Black Cardstock (5-15/16 X 2-3/8) and White Glossy Cardstock (5-13/16 X 2-1/4). The images were from the set "Polka Dots & Petals", and they were stamped in Jet Black Staz-On Ink onto the glossy paper. I used a White Birthday Cake Candle to highlight the petals and circles, then went over the panel with Sponge Daubers and the following inks: Pumpkin Pie Classic Ink, Wild Wasabi Classic Ink, Lovely Lilac Classic Ink, and Purely Pomegranate Classic Ink. This technique is called "Crayon/Wax Resist". The wax from the candle resisted the ink and created highlights in the desired areas. Jumbo Brads were added to the centers of the flowers and circles, and the completed panel was attached to the card base using Dimensionals. The sentiment was from the set "Absolutely Fabulous". It was stamped in Jet Black Staz-On Ink onto Whisper White Cardstock, punched out with the Small Oval Punch, and mounted onto Basic Black Cardstock that was punched out with the Large Oval Punch. The completed panel was attached to the focal panel using SNAIL Adhesive. Easy as 1, 2, 3!

Now for an update on my niece. Her surgery took place at Vanderbilt yesterday morning and afternoon. It went extraordinarily well. They were able to remove the entire tumor without involving any of her vertebrae. They did have to remove a rib that had been broken by the tumor however. The tumor and the rib will be sent off for testing to ensure that there are no living cancer cells in either one. She is in tremendous pain from being cut from the center of her back around to her side, but she is on a morphine pump to manage the pain. The doctor is projecting a 4-5 day hospital stay, but she may come home sooner depending on how quickly she can be weaned off of the morphine. Please continue to pray for her recovery and quick return home. I will keep you all posted as information comes in.

Thanks for stoppin by, and I will see you all tomorrow! Until then......


Saturday, May 31, 2008

..Limited Supplies Challenge #170 : Birthday Trio

The Long Card:
The Standard Card:
The 3X3 Card:
This is my submission for yesterday's Limited Supplies Challenge at SCS. Here were the rules:
  • Create three (3) cards using the same materials with different layouts
  • Use any stamps, but the same must be used for each card
  • Use any cardstock or ink, but the same must be used on each card
  • Use any technique, but the same must be used on each card
  • Use any embellishments, but the same must be used on each card

Here is my supply list for each card:

  • Stamps : It's Your Birthday
  • Papers: Ballet Blue Textured Cardstock, Certainly Celery Designer Series Paper, Jersey Shore Designer Series Paper, Summer Picnic Designer Series Paper, Basic Black Cardstock, Whisper White Cardstock
  • Inks: Jet Black Staz-On, Ballet Blue Craft Ink
  • Accessories: Tombo Mono Multi Liquid Glue, On Board Hearts and Stars Chipboard, Basic Black Brads, Mat Pack, Paper Piercer, Dimensionals, SNAIL Adhesive

I am pooped today, but I hope to see you again tomorrow with a card for the Featured Stamper Challenge at SCS! Thanks for stopping by, and until later...

Saturday, May 24, 2008

...Limited Supplies Challenge #169...Finally!

This is my submission for yesterday's Limited Supplies Challenge at SCS. The rules were as follows: NO HARDWARE!!!! Can you believe it? Jen really hit me where it hurts this time! I love, love, love brads and Hodgepodge Hardware....as if you couldn't tell! So seeing as how I can't use any of my precious hardware I decided to use some stamps and rhinestones instead. All of the images used for this project are from the stamp set "Always". I started with a card base of Basic Black Cardstock that measures 11 X 4-1/4. The next layer up was a piece of White Glittered Cardstock that measures 5-3/8 X 4-1/8. The large red panel consisted of Basic Black Cardstock (3-7/8 X 2-5/8) and Real Red Cardstock (3-13/16 X 2-9/16) that was stamped in Ruby Red Classic Ink with one of the flowers from the set. After the two cardstock pieces were attached to each other using SNAIL Adhesive, all four of the edges were faux stitched using a Mat Pack, Paper Piercer, and Basic Black Stampin' Write Marker.

The focal panel was also made up of Basic Black Cardstock (3-1/4 X 2-1/16) and Real Red Cardstock (3-1/8 X 2) with the addition of Whisper White Cardstock (2-15/16 X 1-7/8). The bird from the set was stamped twice in Real Red Classic Ink; one time on the focal panel, and again on a scrap piece of white cardstock. The bird from the scrap piece was cut out using CutterBee Scissor, then placed over the bird on the focal panel using Dimensionals. A scrap piece of Translucent Vellum was punched with the 3/16" Corner Rounder to create a scalloped edge, and the embossed dots were made using the Crop-a-Dile. The completed panel was then attached to the card base using Dimensionals. The sentiment was stamped onto Whisper White Cardstock in Jet Black Staz-On Ink, punched out with the 1-1/4" Circle Punch, and matted onto a Basic Black Cardstock circle that had been punched out using the 1-3/8" Circle Punch. The same flower used on the side panel was stamped again onto a scrap piece of red cardstock, and punched out with the 1/2" Circle Punch. The flower circle was then added to the center of the "a" in the sentiment using a Dimensional, and the completed sentiment was attached to the card base using Dimensionals once again. To finish off the card Black KaiserScrapbook Rhinstones were added to the bird and the the center of the sentiment.

That's it for today! I'll see you back here tomorrow with a creation for the Featured Stamper Challenge at SCS. Until then.......


Tuesday, May 20, 2008

...Mercy's Tuesday Sketch Challenge #07 & LSC #168


Here's your sketch challenge for today! I made this card for the Limited Supplies Challenge (LSC168) this past week at SCS when I was playing "catch up" on Friday...I just haven't had a chance to post it yet! Here were the rules for that challenge:
  • Use alphabet stamps to create a sentiment
  • The sentiment had to be the focal point
  • Use other stamps as needed on the card
  • Use designer papers and embellishments
I used Tempting Turquoise cardstock as the card base (Layer #1: 6-5/8 X 3-1/2). The Sandy Shells Stampin' Around Wheel was used in Creamy Caramel Classic Ink on a piece of Creamy Caramel cardstock, then matted with a piece of Basic Black cardstock (Layer #2: 5-5/8 X 3). I made the sentiment by stamping Contemporary Alphabet in Jet Black Staz-On Ink on Whisper White cardstock, then colored it with a Tempting Turquoise Stampin' Write Marker. I matted it with Real Red cardstock and Basic Black cardstock (Layer #3: 4-7/16 X 1-7/8). Instead of making a square for the next layer, I opted to stamp the crab from Crab & Company in Jet Black Staz-On Ink onto Watercolor Paper. I used a Real Red Stampin' Write Marker and an Aquapainter to color him in, then cut him out with CutterBee Scissors when he was completely dry. He was popped off of the corner of the sentiment panel using Dimensionals (Layer #4). Three Black Brads were added across the upper left side of the card using a Mat Pack and Paper Piercer to finish it off.

Don't forget to do the following:
  • Use the keywords MTSC07 when uploading to a public gallery
  • Leave a comment at THIS post that includes a link to your card
  • Post a link back here to the original sketch if you upload to your blog

Thanks for stopping by, and I will see you all again tomorrow! Until then.....Hugs ~ Mercy

Supplies

Stamps: Crab & COmpany, Sandy Shells wheel, Contemporary Alphabet

Paper: Tempting Turquoise, Basic Black, Real Red, Creamy Caramel, Whisper White, watercolor

Ink: Creamy Caramel, Jet Black Staz-On

Accessories, markers, aquapainter, dimensionals, brads, paper piercer, mat pack, scissors, adhesive, paper cutter

Saturday, April 26, 2008

...Limited Supplies Challenge #165 & Inspiration Challenge #125

I am so sorry for the late Limited Supplies Challenge post, but I have been away from the house all day. I've only just returned, and now I have to quickly post the details for two challenges....so let's begin with the Limited Supplies Challenge (LSC) at SCS! This was my creation for the LSC today. Here were the rules for this "Scraps Edition #1": make a square card of any size; use only scrap pieces of paper except for the card base; use ribbon/fiber scraps; use only ONE other embellishment; and use any colors, stamps, tools.
So I started with an Old Olive cardstock base, and had mine measure 4-1/4 X 4-1/4. The lower right corner was stamped with the flourish from the set "Stitched Exotics" in Old Olive Classic Ink. The focal panel is made up of some designer papers (Afternoon Tea Designer Series Papers and Fall Flowers Designer Series Papers) that I had collected from past cards and challenges. I punched these designer papers with the 1-1/4" Square Punch to create four different squares, then matted each with Chocolate Chip cardstock that was punched using the 1-3/8" Square Punch. These squares were mounted to a scrap piece of Kraft cardstock (3 X 3), then a scrap piece of Vellum (3 X 3 also) was stamped with the sentiment from "Brighter Tomorrow" in the center with Jet Black Staz-On Ink. I also used a Stamp-a-ma-jig and an Image Sheet for proper placement of the sentiment. There is a staple that is hidden under the 5/8" Chocolate Chip Grosgrain Ribbon bow that holds the vellum in place over the designer paper panel. The focal panel was attached to the card base using Dimensionals to complete it.
This card is for the Inspiration Challenge at SCS for today. You can see my inspiration piece HERE. I chose to go with the earthier colors instead of the bold ones, so here's what I came up with! I started with a Really Rust cardstock base that measured 11 X 4-1/4. A mat of Apple Cider Designer Series Paper was combined with a piece of River Rock cardstock that had been stamped with the leaf outline from the set "Stitched Exotics" in River Rock Classic Ink. A piece of Wild Wasabi Double-Stitched Ribbon was added to the panel were the papers met, then the panel was attached to the base using Dimensionals.

The focal image is the bird from the set "Always", which was stamped in Really Rust Classic Ink onto a piece of Very Vanilla cardstock. Some Copper Stickles was added to the image and allowed to dry. The sentiment, from the set "Together Forever", was stamped above the bird in Bravo Burgundy Classic Ink. The vanilla paper was cut into an oval using the Coluzzle Cutting System, and the edges were sponged with River Rock Classic Ink and a Sponge Dauber. I also cut a larger circle to go behind it from a piece of Bravo Burgundy cardstock. The burgundy piece was made into a scalloped oval with the use of the 3/16" Corner Rounder with the guard removed. The flowers from the same set were stamped in Wild Wasabi Classic Ink onto vanilla paper, cut out with CutterBee Scissors, and dimensionaled (if there is such a word) to each other and to the bird panel. The two ovals were attached to each other with SNAIL Adhesive, and then attached to the card base using Dimensionals again.

That's it for now, but I will see you all tomorrow with a "Christian Update" and some awards! Until then....Hugs ~ Mercy

Saturday, April 19, 2008

...Limited Supplies Challenge #164

Happy Friday, everyone! Thank you so much for stopping by to visit me today. This is my submission for today's Limited Supplies Challenge at SCS. Here were the rules (special thanks to Sherry Cheever for filling in today for Jen, and for giving us such an awesome challenge): make a long card at least 8 X 4, limit layers, limit embellishments, use no commercial designer papers....that last one was a toughy, though! I used the sweet giraffe from Bundle of Joy, and watercolored her with markers and an aquapainter. Once it was dry I added some Stickles to the spots for a little *sparkle*. The Pretty in Pink background strip was stamped with the moon and stars stamp from the same set in Regal Rose. I embellished with some Regal Rose ribbon, and made my own "buttons" using the acrylic pebbles from one of the Build-a-Brad sets and some Regal Rose cardstock.
That's it for today, but I will see you all tomorrow with a card for Beate's Weekend Sketch, and the Inspiration Challenge at SCS. Until then....Hugs ~ Mercy
Supplies
Stamps: Bundle of Joy, Warm Wishes
Papers: Wild Wasabi, Going Gray, Regal Rose, Pretty in Pink, Whisper White, watercolor
Inks: Jet Black Staz-On, Regal Rose Classic Ink
Accessories: mat pack, paper piercer, markers, aquapainter, stickles, 3/4" circle punch, build-a-brad, glue dots, adhesive, dimensionals, stamp-a-ma-jig, image sheet, ribbon

Friday, February 15, 2008

...Limited Supplies Challenge #155, Valentine's Day Card, & A Funny

This is my submission for today's Limited Supplies Challenge at SCS. Here's the rules: circle stamps + sentiment, any color of paper (no designer paper or CuttleBug images), any color ink, circle punches, any round/circle embellsihments, and no limited layers. So this is what I came up with. I started with a card base of Bashful Blue cardstock measuring 8-1/2 X 4-1/4, and when folded to open at the bottom measures 4-1/4 square. The focal panel is made up of Rose Red cardstock (4-1/4 X 1-7/8), Bashful Blue cardstock (4-1/4 X 1-5/8), Rose Red cardstock again (4-1/4 X 1-9/16), and Old Olive cardstock (4-1/4 X 1-1/2). The Crop-a-Dile was used to emboss circles across the center of the olive cardstock, then all of the layers were attaced to each other and the card base using SNAIL Adhesive. A Mat Pack and Paper Piercer were used to create the faux stitching above and below the focal panel. A Chocolate Chip Stampin' Write Marker was used to create the "thread". Chocolate Brads were added to the center of circles that were created using the 1/4" Circle Punch and olive cardstock, then attached to the card base (the mat pack and piercer were used to create the correct spacing between the brads also).


The sentiment is from the set "Lovely Labels", and it was stamped onto Whisper White cardstock twice: once in Rose Red Classic Ink, and again in VersaMark Ink. The VersaMarked image was embossed using the Blue Embossing Powder from the Rich Regals Embossing Stack and a Heat Gun. The rose image was punched out using the 1-3/8" Circle Punch, and the blue embossed image was punched out with the 1-1/4" Circle Punch. I used the Coluzzle Cutting System to make the largest circle from Chocolate Chip cardstock. Each circle was layered on the other, from smallest to largest, using Dimensionals. Then the completed sentiment was attached to the card base with Dimensionals also. And there you have it.....circles, circles, and more circles!


I hope everyone had a great Valentine's Day with your loved ones! I spent the night with my hubby and two boys.....it was wonderful! Speaking of Valentine's Day, I wanted to share this sweet RAK that I received from my customer, and good friend, Lois Billadeau. She LOVES making and mailing cards to everyone. I can always count on getting a beautiful creation from her on every major holiday.......isn't she just the sweetest thang?!? Thanks, Lois!


FRIDAY FUNNY: My friend, Martha Lynn sent me an email with this puppet singing a song about being "da man", and I absolutely cracked up! I had to share it with you! So this is for all you married couples out there!
The Husband Song........ENJOY!!!!


That's it for today! I hope to see you all tomorrow, but I have alot going on. Christian has AAU b-ball practice all morning and afternoon about forty minutes from home, and I have to work on my projects for my classes next week. If I finish them I'll post them for you so you can see what I've been up to! Thanks for stopping by, and until later..........Hugs ~ Mercy

Supplies
Stamps: Lovely Labels
Paper: Bashful Blue, Rose Red, Old Olive, Chocolate Chip, Whisper White
Ink: Rose Red, VersaMark
Accessories: circle punches (1-4", 1-1/4", 1-3/8"), coluzzle cutting system, dimensionals, crop-a-dile, brads, marker, mat pack, paper, piercer, embossing powder, heat gun, adhesive

Friday, February 8, 2008

...Limited Supplies Challenge #154 & Another Cat Chronicle

This is my submission for today's Limited Supplies Challenge at SCS. We were to make a non-traditional Valentine card without using hearts and/or flowers.....you that know me can understand how hard this was to come up with due to my fondness for both hearts and flowers! But I think I did it. I started with a card base of Bashful Blue cardstock that measures 11 X 4-1/4, and when folded to open at the bottom measures 5-1/2 X 4-1/4. The next layer up is Kraft cardstock (5-1/2 X 2-3/4) that has been stamped with the "Canvas Background Stamp" in Close to Cocoa Classic Ink. The left edge of the panel is faux stitched using a Mat Pack, Paper Piercer, and a White Signo Gel Pen. The panel was attached to the card base with SNAIL Adhesive. The dark brown panel is Chocolate Chip cardstock (3-1/2 X 2-1/4) with 5/8" Chocolate Chip Grosgrain Ribbon wrapped around the center and tied in a knot. The brown panel is attached to the card base with Dimensionals.


The focal panel is made up of Bashful Blue cardstock (3-1/4 X 2-1/4) and Sage Shadow cardstock (2-1/4 X 7/8). CutterBee Scissors were used to cut the top edge of the sage paper to resemble grass, then the grass piece was attached to the blue panel using SNAIL Adhesive. The focal image is the treasure chest from the set "Ahoy Matey", and is stamped in Staz-On Black Ink onto a piece of Watercolor Paper. I used Derwent Studio Colour Pencils, Minieral Spirits, and Blending Stumps to color the image, then cut it out using both scissors and a Hobby Blade. The cut out was added to the focal panel using Dimensionals, then the completed panel was added to the card base with the help of more Dimensionals. I stamped part of the sentiment ("you arrr" from "Ahoy Matey") in Chocolate Chip Classic Ink using a Stamp-a-ma-jig and Image Sheet to get the placement correct, but I wrote the rest with a Brown Fine-Tipped Sharpie. So my handmade sentiment reads, " You ARRR My Treasure". Do you think my boys will like it? I sure hope so!


Since it's Friday I want to share another funny! Ladies and Gentlemen......Please enjoy another installment of "The Cat Bathing Chronicles":

"No, no, no, no.......NOOOOOOOOOO!"

Have a very happy Friday, everyone! That's it for today, but I hope to be back tomorrow with another creation. So until then.....Hugs ~ Mercy


Supplies

Stamps: Ahoy Matey, Canvas BG

Paper: Bashful Blue, Kraft, Chocolate Chip, Sage Shadow, Watercolor

Ink: Black, Chocolate Chip, Close to Cocoa

Accessories: mat pack, paper piercer, gel pen, adhesive, ribbon, scissors, dimensionals, colour pencils, mineral spirits, blending stumps, hobby blade, sharpie, stamp-a-ma-jig, image sheet

Saturday, January 5, 2008

...Ways To Use It Challenge #147 & Limited Supplies Challenge #149


This was my submission for Thursday's Ways To Use It (WT) and yesterday's Limited Supplies Challenge (LSC). I have had many people wanting me to make more altered projects, so this was the perfect opportunity to do just that...an Altered Chipboard Picture Frame. The WT was to use flowers in any way we wanted, so I built this flower using Silk Flower Arrangements around the house. Ten petals of various sizes were arranged, and were then held together with a beautiful Pearl Brad. The LSC was to NOT use any shade of white or vanilla...Jen actually named this challenge "What?"...and that said it all! The Chipboard Picture Frame (by Creative Imaginations) was painted with Black Acrylic Paint and a Sponge Brush. Once dried, the front was covered with a piece of designer paper from BasicGrey's Scarlett's Letter collection. Mod Podge was used as an adhesive, and a generous coat was painted onto the frame with another sponge brush. Special care was taken to remove any air pockets or bubbles that appeared under the paper. The frame was placed upside down onto the table with a couple of heavy books on top until it had dried completely. A Sponge Dauber was used to sponge Basic Black ink around all of the edges (the outside of the frame and the frame window). The outside edges of the frame were sanded down with Sanding Blocks to make them more uniform. Another coat of Mod Podge was painted over the frame front, and was then set aside to dry.


The sentiment (from Shakespeare's "Venus and Adonus") is one of my personal favorites . It reads, "Love comforteth like the sunshine after rain." PhotoShop was used to configure the layout and font of the sentiment, then printed onto an 8-1/2" X 11" piece of Gray Vellum Paper. The wet ink on the vellum was allowed to dry completely, then the vellum was cut down to the exact size of the frame window. A piece of thick, clear plastic was used inside the frame window (instead of glass), so the sentiment panel was placed behind it. The flower was secured to the lower left corner of the frame window with Pop-Up Glue Dots.


That's it for today...so what do you think? I had a blast working on this, so I have made plans to make at least one altered project a week. You all have made some wonderful suggestions in your blog candy comments, and I am going to try to honor each of them with my creations tis upcoming year. Thanks for stopping by today, and don't forget to leave a comment on the post above to win some BLOG CANDY if you haven;t already made one. Thanks also for all of your kind words and encouragement! You are my inspiration, and I love creating artwork to share with you. So until next time...Hugs ~ Mercy


Supplies


Paper: Scarlett's Letter paper (BasicGrey)


Ink: Basic Black, Gray Vellum


Accessories: Chipboard Picture Frame (Creative Imaginations), silk flowers, pearl brad, acrylic paint, foam brushes, sponge dauber, glue dots, Mod Podge, computer and printer

Friday, December 28, 2007

...Limited Supplies Challenge #148

This was my submission for today's Limited Supplies Challenge at SCS. The title of this one was "Follow The List #6", and here were the rules:
  • Stamps : one focal image that could be colored, a sentiment (optional), an image to ground the focal image (i.e. grass, oval, etc. - optional)

  • Papers: any shade of white, 2-3 patterns of designer paper, NO OTHER COLORED CARDSTOCK

  • Tools: no specialty tools (i.e. punches, CuttleBug, piercer, etc.), any coloring tools could be used, sponges were also acceptable

  • Embellishments: one piece of ribbon

Those were the parameters given, so I had to think-up a clean and simple design. Unable to do so, I decided to use a layout that I had used previously on one of my Christmas cards. Here's how it all came together...


The card base is actually a piece of Watercolor Paper that measures 11" X 4-1/4", and when folded in half (to open at the bottom) measures 5-1/2" X 4-1/4". The designer papers (dp) were from the Cerise Designer Series Paper collection from Stampin' Up! The bottom dp measures 4-1/4" X 2-1/4", and the top dp measures 4-1/4" X 2". They are attached to each other using SNAIL Adhesive, then to the card base using Dimensionals after a piece of Red Organdy Ribbon was tied around the left side of the panel. A Basic Black Stampin' Write Marker and a Ruler (that has every 1/8 of an inch marked) were used to add the row of dots above the dp panel (since I couldn't use my Mat Pack).

The focal image is a heart from the upcoming Spring-Summer 2008 Catalog and Idea Book hostess set "Time Well Spent". It was stamped in Black Staz-On ink onto a scrap piece of Watercolor Paper, and colored using a Blender Pen and Real Red ink. Christmas Red Stickles were used to color the inside section of the heart to give it some sparkle, and once it had dried the heart was cut out using CutterBee Scissors. The sentiment is from the current catalog's hostess set "So Many Sayings", and it was also stamped in Black Staz-On ink onto Watercolor Paper. The sentiment was cut out using my Paper Cutter, then attached (with Dimensionals) to a scrap piece of Watercolor Paper that measured 1-1/2" square after the edges of both were sponged in Real Red ink with a Sponge Dauber. The heart was then attached to the square with Dimensionals also.

That's it for today! Thanks for stopping by today, and I hope everyone has a wonderful and safe weekend. I hope to see you back with a couple of cards for the Inspiration and Featured Stamper Challenges this weekend. Until then.....Hugs ~ Mercy

Supplies

Stamps: Time Well Spent, So Many Sayings

Paper: Watercolor, Cerise Designer Series Paper

Ink: Black Staz-On, Real Red

Accessories: stickles, dimensionals, scissors, paper cutter, organdy ribbon, blender pen, ruler, marker, sponge dauber, and adhesive

Friday, November 30, 2007

...Ways To Use It Challenge #142 & Limited Supplies Challenge #144

This is my submission for yesterday's Ways To Use It Challenge at SCS. We were to use metallic paper in our card designs, so I used this wonderful Silver Metallic Cardstock. I ran it through my Sizzix Machine with a CuttleBug Embossing Folder (Textile Texture) to give it some dimension before putting the card together. I started off with Basic Gray cardstock that measures 11" X 4-1/4" stamped in Basic Gray ink with the Canvas background stamp. The edges are sponged in gray ink also using a Sponge Dauber. I used the Photo Corner Punch to punch out some Cranberry Crisp and the metallic cardstock. I used cranberry for the larger corner, and the silver metallic for the smaller. The silver is attached to the cranberry using Dimensionals, then the cranberry is attached to the card using SNAIL Adhesive.


The center panel is made up of the following cardstocks and dimensions: cranberry (4-1/4" X 1-3/4"), gray (4-1/8" X 1-5/8") and silver metallic (4" X 1-1/2"). Both the small and large flowers are from the set Season of Joy. They are stamped in cranberry onto Whisper White paper then cut out. I then used the Spring Bouquet Punch to punch out a scrap piece of silver metallic paper. The punched flowers are attached to the center of the large cranberry ones using Dimensionals, then the small flowers are attached to the centers of the silver ones in the same manner. The sentiment is from the set All Holidays, and it is stamped in cranberry ink onto white paper that measures 1-3/4" X 13/16". The sentiment is matted onto silver metallic cardstock measuring 2" X 1-1/8", and then the silver is matted onto cranberry that measures 2-1/8" X 1-1/4". The sentiment panel is mounted onto the center panel using dimensionals, then the flowers are attached to separate corners of the sentiment with double-layered dimensionals.


This is my submission for today's Limited Supplies Challenge at SCS. Here were the rules for "The Mini Main Event": use mini stamps (no larger than 1.5" X 1.5"); use any backgrounds, flourishes, and borders; limit layers of cardstock; use up to two specialty tools; use any coloring tools; and finally, use one type of embellishment. So this is what I came up with! I started with a card base made from a piece of Canson's Watercolor Paper from their Biggie Jr Watercolor Paper Pad. It measures 11" X 4-1/4", then folded in half to open from the bottom. The center panel is made up of the following paper/cardstock and dimensions: Always Artichoke cardstock (4-1/4" X 2-3/4"), watercolor paper (4-1/4" X 2-5/8"), and Always Artichoke Designer Paper (4-1/4" X 2-1/2"). The papers are attached to each other using SNAIL Adhesive, then some Artichoke Organdy Ribbon was tied around the left side of the panel. The panel is attached to the card base using Dimensionals. I used my Basic Black Stampin' Write Marker and Mat Pack to draw a row of dots across the top of the panel.


The focal image is from the set Love Notes, and it is stamped in Staz-On Black ink onto watercolor paper. I used my Aquapainter to color the tree Always Artichoke, the star Yoyo Yellow, and the background Bordering Blue. I then used the 1-1/4" Square Punch to punch out the image. It is mounted onto a piece of Mellow Moss cardstock that was punched out using the 1-3/8" Square Punch. Then the two squares were attached to a piece of artichoke paper that was cut with my Paper Cutter to measure 1-1/2" square. The focal panel is attached to the center one using dimensionals again.


That's it for today.....two cards have sapped all of my energy, so I am going to relax for a while before a long weekend of non-stop running. Thanks for stopping by today, and I hope to see you tomorrow with a creation for the Inspiration Challenge. Have a wonderful weekend........Hugs ~ Mercy

Supplies
Stamps: Canvas, Season of Joy, All Holidays, Love Notes
Paper: Basic Gray, Cranberry Crisp, Silver Metallic, watercolor, Always Artichoke cardstock and Designer Paper, Mellow Moss
Ink: Basic Gray, Cranberry Crisp, Black Staz-On, Always Artichoke, Yoyo Yellow, Bordering Blue
Accessories: CuttleBug embossing folder, Sizzix machine, dimensionals, SNAIL Adhesive, black stampin' write marker, mat pack, organdy ribbon, square punches (1-1/4", 1-3/8"), sponge dauber

Friday, November 23, 2007

...Limited Supplies Challenge #143

This is my submission for today's Limited Supplies Challenge at SCS. I used Kraft cardstock (11" X 4-1/4") for the card base, and stamped it in Chocolate Chip ink with the Aida Cloth background stamp. The edges of the card are sponged using chocolate ink with a Sponge Dauber. The next layer is Chocolate Chip cardstock measuring 3-3/4" X 5-1/8". The focal image is on Very Vanilla cardstock that measures 3-5/8" X 4-7/8". I used my Coluzzle Cutting System to cut out an oval on a scrap piece of cardstock, and used the cut out portion as a template to make the sponged oval. I held the template in place over the vanilla paper while stamping the Aida Cloth background stamp in Creamy Caramel ink through the cut out part of the template. While still holding the template in place, I stamped the snowflakes from the set Snowflakes in chocolate then sponged the inside of the focal image in caramel with a Sponge Dauber. I wanted it to look more antique, so I sponged the outside edges in chocolate ink, too. I removed the template to reveal the finished focal image. The image is flat in real life, but looks to be several layers without the fuss of having to use more and more cardstock. This technique is called "Reverse Masking". The "season's greetings" from the set Many Merry Messages is stamped in chocolate at the bottom of the vanilla cardstock. The vanilla is then attached to the chocolate cardstock using SNAIL Adhesive before adding the Aged Copper Hodgepodge Hardware and Brad. I tied 3/8" Chocolate Grosgrain Ribbon around the hardware to finish off the card. The focal panel is then added to the card base using the same adhesive.

That's it for today, but I will see you all tomorrow with a submission for the Inspiration Challenge! Hugs and Happy Shopping ~ Mercy

Supplies

Stamps: Aida Cloth, Snowflakes, Many Merry Messages

Paper: Kraft, Chocolate Chip, Very Vanilla

Ink: Creamy Caramel, Chocolate Chip

Accessories: sponge daubers, aged copper hodgepodge hardware, chocolate ribbon, coluzzle cutting system

Friday, November 16, 2007

...LSC142: Infused With Love, and Blog Candy Winner

This is my submission for today's Limited Supplies Challenge at SCS. We were to use 2-3 stamps (one had to be a heart or sentiment), use one pattern of designer paper, use one embellishment, use one specialty tool, use limited layers, and use any coloring tools. I made a 5-1/2" square card with Old Olive cardstock, and sponged the edges with Chocolate Chip ink with a Sponge Dauber. I used designer paper from BasicGrey's Infuse 6 X 6 paper pad, and cut it to measure 5-3/8" square. I used the flourish from Baroque Motifs, and stamped in onto the designer paper using the chocolate ink again. The striped paper is attached to the olive cardstock using SNAIL Adhesive.

The side panel is Chocolate Chip cardstock measuring 4-1/2" X 4", and So Saffron cardstock measuring 4-3/8" X 3-7/8". The saffron piece is stamped in chocolate ink using the Sanded background stamp, and the "love" sentiment from the set Love & Joy. The two pieces are attached to each other, then attached to card base. I stamped the "merry" sentiment from Love & Joy in olive, and punched it out using the 3/4" Circle Punch. The edges are sponged in chocolate, and the 1/8" Handheld Punch was used to make the hole for the Rhinestone Brad to be added. A scrap piece of chocolate cardstock is punched using the 1" Circle Punch, and the two circles were attached using a Dimensional. These circles were used to make the "o" in "love", and are popped up from the card base using a dimensional again. The heart itself is a piece of chipboard from On Board Accents, and is covered with the same striped paper used on the card base. I traced the shape onto the back of the designer paper, cut it out, then sponged the edges with chocolate ink. The paper was glued to the heart using a spray adhesive, then the edges were trimmed with scissors and sanded with a Sanding Block. The heart is attached to the card base using strips of foam tape.


Now for the winner of the blog candy giveaway goodies! And the winner is #69.............................. Angel Wilde ....congratulations, Angel! Please email your address to me so I can get your goodies out on Monday. Thanks to everyone for sharing your list of individuals who inspire you. I truly enjoyed reading all of them. I have to include myself with the majority of you...I get inspiration from everywhere: SCS, blogs, magazines, and nature. It doesn't matter where the inspiration comes from as long as we take time to create from our hearts...then we might even inspire others. Thanks so much for your heartfelt comments, and for faithfully visiting me...you all have been my inspiration!

Well that's it for today! I hope to see you all here tomorrow with another creation for the Inspiration Challenge. Hugs ~ Mercy


Supplies:


Stamps: Love & Joy, Sanded, Baroque Motifs


Paper: Old Olive, Chocolate Chip, So Saffron, Infuse by BasicGrey


Ink: Old Olive, Chocolate Chip


Accessories: rhinestone brad, chipboard heart, dimensionals, scissors, circle punches (3/4" and 1"), 1/8" handheld punch, sponge