Pages

Showing posts with label Featured Stamper Card. Show all posts

Monday, February 7, 2011

…Love You Friend!

card_1570

card_1570_closeup

Happy Monday, everyone!  I’m just dropping in today to share my submission for yesterday's Featured Stamper #209 at SCS, and the lucky recipient was my sweet and fabulous friend, Lori Boyd {aka 3Bugs&Me}. Lori is such a precious and uber-talented lady who can color like nobody’s business!  For that reason I chose to CASE her card HERE, but I changed several things to make it my own: the layout, the patterned papers, and the sentiment.  I also used one of her newer digital images called “Sugar Sticks-Love You Friend” from By LORi Designs.   I printed the image in Black, then colored them using my Copic Sketch Markers.  I paired the focal panel with patterned papers and from Love Me Do Kit by My Mind’s Eye along with some Lemon Tart and White Cardstock.  I added some Red Stitching to the large plaid patterned paper panel, then also added some Paper Piercing to the polka-dotted paper panel.  The hearts, the border strip, and the photo corner were diecut elements that were included in the MME paper kit…but I added a punched flower (using the Trio Flower Punch) with a Silver Brad center to the photo corner element.  After adding a TON of Dimensionals (which I purchased HERE from Jody Morrow at a FABULOUS price) the card was complete.

That’s it for me today!  Thanks for stopping by, and I’ll see you back here either tomorrow with another Whimsie Doodles card!  Until then…

blog_signature_winter_2_no swirls copy

Sunday, December 6, 2009

...From The Heart

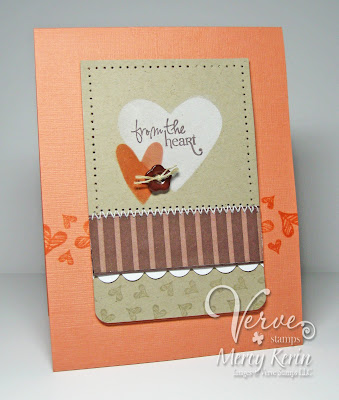
Have I ever told you that I love Verve Stamps? Every month I am blessed to receive a perfectly-wrapped package containing the most extraordinary stamps in the world! This month was no different. I was so happy to see that this month's releases were so whimsical on nature...fun and fantastic fonts, and handsome hand-drawn images. Luckily, I got to use some of them to create this card for today's Featured Stamper #148 at SCS...mitchygitchygoomy! I chose her card HERE to CASE (copy and share with everyone). I kept her same layout, but changed everything else. I used the large and small hearts from Thankful Accents to create the horizontal strip across the cardbase. I used the heart border image from Thankful Hearts on the lower portion of the Kraft focal panel, and one of the sentiments from the same set inside my focal image. The focal hearts were created the same way that I created the one yesterday, but I used white craft ink instead. After it dried, I repeated the process with a different heart shape in guava ink. I added a Chocolate Button and Linen Thread for a third element.

I decided to sew a piece of Chocolate Chip Designer Series Paper to the focal panel after I had matted it with chocolate cardstock. I also added a white scalloped border to the bottom for some contrast to the browns...but it still didn't look right yet. DUH...paper piercing! LOL! I pierced around the upper portion of the panel to frame the focal hearts. That was just the touch it needed...or was it? The more I looked at it, the more I was certain that something else needed to be done. I finally walked away from my crafting area for a break when it hit me...corner rounding! I rushed back to my table, and rounded the corners on the bottom of the panel. I was finally satisfied! What do you think of the end result?

That's it for me! It's my birthday, and I am going to spend it running around with my guys today. I will see you back here tomorrow, though! Until then...
Supplies
Stamps: Thankful Hearts, Thankful Accents (Verve)
Papers: Groovy Guava Textured, Kraft, Whisper White, Chocolate Chip, Chocolate Chip DSP
Inks: Groovy Guava, Sahara Sand, Chocolate Chip, Whisper White Craft
Accessories: scallop edge punch, sewing machine, full heart punch, heart to heart punch, sponge dauber, button, linen thread, mat pack, paper piercer, 3/16" corner rounder, dimensionals

Sunday, June 28, 2009

...Featured Stamper #125

DON'T FORGET TO ENTER TO WIN SOME BLOG CANDY HERE!
This is my submission for today's Featured Stamper #125 at SCS, Dawn Lusk {aka DawnL}. Dawn is such a sweet lady who loves to leave kind and encouraging comments in the gallery...I was so glad to see that she was chosen as today's recipient. I chose to CASE her card "IC169 From Me To Cole", but I changed several things to make it my own: the layout, the colors, the patterned papers, and the sentiment. I started with a Regal Rose Cardstock base, then matted each additional layer with Chocolate Chip Cardstock. The patterned papers were all from the Sweet Always Designer Series Paper pack, and the polka dotted panel was pierced with a Mat Pack and Paper Piercer. The image was from The Greeting Farm (TGF) stamp set called "Home Sweet Home", and was stamped in Chocolate Chip Craft Ink. It was then embossed with Clear Embossing Powder and a Heat Gun. I colored this precious image with Copic Sketch Markers, then cut it out with CutterBee Scissors. The image was attached tot he Whisper White Cardstock focal panel using Dimensionals. The sentiment is also from one of TGF's sets called "Sentiments", and it was stamped in the same manner as the focal image. A piece of 5/8" Chocolate Chip Grosgrain Ribbon and three Silver Brads were added to complete the card.

That's it for today! Thanks for stopping by to see me, and I will see you again tomorrow with a Treat Purse Project! Until then...

Sunday, May 24, 2009

...Featured Stamper #120

It's MEEEEEEEEEE! I am the Featured Stamper for today at SCS! Head on over to participate...I would love to see and comment on what you come up with!

Monday, January 19, 2009

...Shabby Chic Feature


This is my submission for yesterday's Featured Stamper Challenge #102. The lucky recipient of this honor was the-one-and-only Lori Craig (aka stamp_momma). I simply adore her entire gallery, but I ultimately chose to case THIS CARD. I don't usually make cards that fit into the "shabby chic" category, so it was a bit of a challenge...but I like the way it turned out! I changed the following elements in order to make it my own:

  • Stamp set used
  • Layout (just a bit, but you can still see that it is a CASE)
  • Embellishments
  • No Designer Series Papers

I started with a So Saffron Cardstock base, then matted each additional layer with Chocolate Chip Cardstock. The large background panel consisted of So Saffron Cardstock that had been embossed using the Swiss Dots Cuttlebug Embossing Folder, then the edges were faux stitched using a Mat Pack, Paper Piercer, and a Chocolate Chip Stampin' Write Marker. Three Aged Copper Brads were added down the upper left side, and a piece of 5/8"Chocolate Chip Grosgrain Ribbon was added around the entire panel. I also used some Copper Cording around the knot in the chocolate ribbon.

The focal panel was Whisper White Cardstock that was stamped with the "Flourishes" set from Inkadinkado. The flourish was stamped in So Saffron Craft Ink, then embossed with Clear Embossing Powder and a Heat Gun. The butterfly was stamped in Chocolate Chip Craft Ink, and embossed the same way. The edges of the white cardstock were sponged using a Sponge Dauber and the So Saffron Classic Ink Pad. The sides were also faux stitched in the same manner as the large background panel. The sentiment was from the "Feeling Groovy" set from Verve Visual. It was stamped in Chocolate Chip Classic Ink on a scrap piece of white cardstock, then the edges were sponged in the same manner as the focal panel. The large background layer was attached to the card base using Dimensionals, then the focal panel was attached to the large panel in the same way.

That's it for today! Thanks so much for swinging by, and I will see you all again tomorrow with another installment of Mercy's Tuesday Sketch Challenge. Until then...

Supplies
Stamps: Flourishes (Inkadinkado), Feeling Groovy (Verve Visual)
Papers: So Saffron, Chocolate Chip, Whisper White
Inks: Craft: So Saffron, Chocolate Chip; Classic: Chocolate Chip
Accessories: acrylic blocks, mat pack, paper piercer, embossing folder, embossing buddy, clear embossing powder, heat gun, brads, ribbon, cording, dimensionals

Sunday, January 4, 2009

...Featured Stamper #100

This is my submission for today's Featured Stamper Challenge at SCS. The lucky recipient of this honor was Julie Ebersole (aka JulieHRR at SCS). She has an awesome gallery, but I ultimately chose THIS CARD of hers to CASE. I kept the same layout and general look, but I made several changes to make it my own. I changed the following:

  • Colors
  • Stamps Sets
  • Sentiment Placement
  • Embellishments

I started with a Whisper White Cardstock base, then used Basic Black Cardstock for the base of the focal panel. The flowers were from the set "Season of Friendship", and they were stamped in the following colors on Whisper White Cardstock: Real Red Classic Ink, Tempting Turquoise Classic Ink, and Only Orange Classic Ink. Each bloom was punched out using the 3/4" Circle Punch, then Silver Brads were placed in the center of each. The completed flowers were then popped onto a piece of Only Orange Cardstock using Dimensionals. The sentiment (from the set "Thank You Kindly") was stamped in Only Orange Craft Ink, then embossed with Orange Embossing Powder and a Heat Gun. A piece of Pumpkin Pie Striped Grosgrain Ribbon was tied around the card to finish it off. I used the Horizontal Slot Punch to punch a slit in the side of the focal panel to run the ribbon behind the panel so I wouldn't cover up the sentiment...love how this turned out!

That's it for today...cross my heart! I have to work on some of the projects for my clubs this week, so I will be pretty busy with those for the rest of the night. Thanks for stopping by, and I will see you all again tomorrow! Until then...

Supplies
Stamps: Season of Friendship, Thank You Kindly
Papers: Whisper White, Basic Black, Only Orange
Inks: Real Red Classic Ink, Tempting Turquoise Ink, Only Orange Classic Ink, Only Orange Craft Ink
Accessories: 3/4" circle punch, orange embossing powder, embossing buddy, heat gun, ribbon, brads, dimensionals, adhesive

Sunday, December 7, 2008

...Featured Stamper #96

This was my submission for today's Featured Stamper Challenge at Splitcoaststampers. The lucky recipient of this honor was one of my favorite stampers...Annascreations. You can view her amazing gallery HERE, but THIS was the card that I chose to CASE. I changed the following components of the card to make it my own: color combination, stamp set, sentiment, and layout.

I started with a Basic Black Cardstock base, then matted it with Whisper White Cardstock. The focal panel was Whisper White Cardstock that was sponged in Purely Pomegranate Classic Ink and a Sponge Dauber. I took a scrap piece of cardstock, and ran it through my Sizzix Big Shot Die-Cut Machine with the Sizzix Bigz Tulipe Die. I removed all of the cut pieces so that I had the outline to work with. After sponging the image I used a VersaMarker to trace the sponged image. I worked very quickly, then embossed the image with Clear Embossing Powder and a Heat Gun. The sentiment was from the set "Thank You Kindly" from Stampin' Up! It was stamped in Basic Black Craft Ink using a Stamp-a-ma-jig and Image Sheet for proper placement, then it was embossed with Clear Embossing Powder and a Heat Gun. Three Basic Black Brads were added down the right-hand side of the focal panel using a Mat Pack and Paper Piercer. The completed panel was matted with Basic Black Cardstock, then popped up off of the bottom white mat using Dimensionals.

That's it for today! Thanks for stopping by today, and I will see you all again tomorrow. I have a Christmas tree to put up and decorate, and then I have several loads of laundry to wash...fun, fun, fun! So I will be a bit busy for the next little while. Until later...

Supplies
Stamps: Thank You Kindly
Papers: Basic Black, Whisper White
Inks: Purely Pomegranate Classic Ink, Basic Black Craft Ink
Accessories: versamarker, embossing buddy, clear embossing powder, heat gun, stamp-a-ma-jig, image sheet, brads, dimensionals, sizzix big shot, tulipe bigz die, sponge daubers

Sunday, July 6, 2008

...Featured Stamper Challenge #74, & A RAK

This is my submission for today's Featured Stamper Challenge at SCS : Teneale Williams, aka {Teneale}. She has a very clean and crisp style that I absolutely love. She is one of my favorites, and I know she will quickly become one of yours if she isn't already! She also has a blog that can be seen HERE. I chose THIS CARD to CASE, but changed several elements to make it my own. These changes include : layout (I added one more layer), colors, stamps, and sentiment.

I started with a Kraft Cardstock card base, then layered a piece of Perfect Plum Cardstock on top of it that had been stamped in Very Vanilla Craft Ink with "Fine Lace". The next layer up was Pale Plum Cardstock that was faux stitched around the edges using a Mat Pack, Paper Piercer, and Chocolate Chip Stampin' Write Marker. The edges were also distressed using the Heidi Swapp Distressing Tool. The focal panel consisted of Kraft Cardstock and Very Vanilla Cardstock. The vanilla was stamped with "Silhouettes" from See-D's in Chocolate Chip Classic Ink. A small amount of Liquid Applique was squeezed out into two wells of a Painting Palette. I used one drop of reinker from the Perfect Plum Reinker and again with the Pale Plum Reinker to create my own custom colors of liquid applique. Once the colors were mixed evenly, I then used a Small Paintbrush to dot the blooms on the three stamped stalks. The two outer stalks were coated with the Perfect Plum Liquid Applique, and the center was coated with the Pale Plum Liquid Applique. The applique remains wet, so you must use a Heat Gun to make it "poof up".

The sentiment was from the set "All Holidays", and was stamped by coloring in the "love" only with a Perfect Plum Stampin' Write Marker. It was then stamped onto a scrap piece of Kraft Cardstock, and punched out using the Small Oval Punch. The Large Oval Punch was used to punch out a scrap piece of Perfect Plum Cardstock to layer behind the kraft sentiment piece. The completed panel was attached to the focal panel using Dimensionals. Two pieces of Kraft Taffeta Ribbon were added behind the focal panel using SNAIL Adhesive, and Lavender KaiserScrapbook Rhinestones were added to the sides of the focal panel and the sentiment panel.

I also received this beautiful RAK from Amy Rohl (aka rohla at SCS) in the mail. I had sent her a birthday card last month, and she sent this awesome card as a "thank you". Thank you so much for this phenomenal RAK, Amy...I will display this puppy with pride!

That's it for today! Thanks for stopping by, and I will see you tomorrow with another creation. Until then....


Monday, May 26, 2008

...Featured Stamper Challenge #68 & Some Wedding Invitation Samples


This first card is for the Featured Stamper Challenge at SCS. The lucky recipient this week is the talented Denise Marzet, aka peanutbee. Not only does she have a ROCKIN' gallery that can be seen HERE, but she also has an amazing blog that can be seen HERE! I chose to case THIS card, but I made several changes to make it my own. These changes include: color, stamps used, and sentiment. I kep the layout pretty much the same, but had to alter it a bit to make room for my cupcakes!

I used the stamp sets "Cause For Celebration" and "All Holidays" along with the following cardstock colors: Yoyo Yellow, Real Red, Pumpkin Pie, Whisper White, and Watercolor Paper. The cupcakes were stamped in Jet Black Staz-On Ink onto the white cardstock, then again onto watercolor paper. Each cupcake was watercolored using Stampin' Write Markers (Creamy Caramel, Real Red, Pumpkin Pie, Yoyo Yellow) and Aquapainters. Red, Yellow, and Orange Glitter was added to the tops of the cupcakes for a little *sparkle*, then each watercolored goody was cut out and placed over the images on the white cardstock using Dimensionals. Three Red Brads were added to finish off the card after the sentiment was stamped using a Stamp-a-ma-jig and Image Sheet for placement.


These two cards are for a friend of mine. She is planning her son's wedding, and asked me to design several invitations for her to choose from. These are A2 cards, but I've also made some 5X7 and 4X6 samples for her. What do you think of these?

That's it for today, but I will see you back here tomorrow with something for the Color Challenge at SCS, and the Featured Swapper Challenge at the GSG blog. Until then...


Thursday, May 22, 2008

...A Triple Challenge Card(CC167, SC177, WT167), and Featured Stamper #67


This is my card for THREE challenges on SCS: Color Challenge, Sketch Challenge, and Ways To Use It.....GO ME!!!! The colors we were to incorporate are as follows: Blue Bayou, Soft Sky, and Certainly Celery. The Sketch Challenge can be seen above, and the Ways To Use It Challenge was to create a masculine card. I wasn't sure if the Blue Bayou Double-Stitched Ribbon would qualify as a masculine accent, so I placed it on an element that could be removed if needed. The background is stamped with Canvas in Certainly Celery Classic Ink. The focal image consists of the pine tree from Lovely As A Tree in Blue Bayou Classic Ink, and the sentiment was from Live Your Dreams in Jet Black Staz-On Ink. I used a Stamp-a-ma-jig and Image Sheet for proper placement. The sky was created by using a Brayer that was rolled in Soft Sky Classic Ink. I also used the 1/4" Circle Punch to lay Blue Bayou cardstock circles under the Silver Brads on the upper and lower panels.

And yet another card for an SCS challenge: Featured Stamper. The lucky, and UBER-talented, recipient this past Sunday was Dawn McVey...aka dawnsing. She has a brilliant eye for clean and crisp colors and layouts...I absolutely love her. She is also a fellow GreatSwaps Girl! You can check out her blog HERE. I chose to CASE the card seen HERE in her SCS gallery, because I adored the layout. I changed everything except the layout in order to make it my own. The card base was Bashful Blue cardstock, and I used scrap pieces of patterned papers from the Summer Picnic Designer Series Paper, and Old Olive Designer Series Paper packs to create the different stripes. They are matted onto Old Olive cardstock, and a strip of olive cardstock was pierced using a Mat Pack and Paper Piercer also to cover the seam between the red dotted and olive striped papers. A piece of 1/4" Whisper White Grosgrain Ribbon was tied around the seam between the olive striped paper and cherry paper.

The sentiment from Always was stamped in Jet Black Staz-On Ink onto Whisper White cardstock, then was punched out using the 1-1/4" Circle Punch. A scrap piece of Old Olive cardstock was also punched out using the 1-3/8" Circle Punch, then some Real Red cardstock was punched out with the Scalloped Circle Punch. Each layer was attached to the other using SNAIL Adhesive, then one of the small flowers (also from the set Always) was stamped in Bashful Blue Classic Ink onto Bashful Blue cardstock. The stamped flower was punched out using the 1/2" Circle punch, a White Brad was added to the center, and the flower circle was added to the center of the "a" using a Dimensional.

That's it for today! Thanks for stopping by, and I'll see you all again tomorrow.


Monday, April 28, 2008

...Featured Stamper #64 & Some Awards

This is my submission for today's Featured Stamper Challenge at SCS. The lucky recipient was Michelle (aka sf9erfan)...she is a brilliant and very talented stamper. I chose to CASE her card seen HERE, but I made several changes to make it my own which include: the colors, the layout, and the sentiment. I used Big Pieces for the top portion of the card, then used one of the sentiments from "All Holidays" on the bottom. The colors for this card include: Wild Wasabi, Real Red, Bashful Blue, and Pumpkin Pie. Stardust Stickles were added to some of the pieces, and some doodling was added around the edges of the Whisper White cardstock.


AWARD #1: The Arte Y Pico Award....I received the first one from my dear friends, Judy Rozema over at Joy In A Jar, and Kelli Roberts at Kelli Scraps. Here is how it works: There are 5 rules attached to this:

  • 1. You have to pick 5 blogs that you consider deserve this award for their creativity, design, interesting material, and also contributes to the blogging community, no matter what language.


  • 2. Each award has to have the name of the author and also a link to his/her blog to be visited by everyone.


  • 3. Each award winner has to show the award and put the name and link to the blog that has given her/him the award itself.


  • 4. The Award winner and the one who has given the prize have to show the link of "Arte Y Pico" blog, so everyone will know the origin of this award.


  • 5. To show these rules.

There are so many wonderful blogs that deserve this award, and it was very hard for me to narrow the field down to only five...but since I had to I awarded the following fabulous stampers:

AWARD #2: This one was given to me from my bestest blog buddy and inspiration, Chat Wszelaki. I can't tell you how exciting it is to know that you have brightened someone's life along the way, but it sure feels good! Here are some of my Lucys and Ethels:

Well that's it for today, but I will see you tomorrow with a card for the Technique Lovers Challenge and some news about Christian. Until then...Hugs ~ Mercy

Sunday, April 20, 2008

...Featured Stamper Challenge #63

This is my submission for today's Featured Stamper Challenge at SCS. The lucky recipient is one of my precious cyber buddies, Silke Ledlow (aka sparklegirl). I chose THIS card from her gorgeous gallery to CASE with several changes in order to make it my own. Some of the changes include: the stamp set used, the layout (only a bit in order to fit the image used), the colors, and the embellishments. The colors on this card were Soft Sky, Chocolate Chip, and Whisper White with some of the Afternoon Tea Designer Series Papers. I used the mini catalog set "She's All That" and stamped it in Chocolate Chip Classic Ink onto Whisper White cardstock. In honor of Ms. Sparklegirl I covered the veil and some of the gown in Cinnamon Stickles for some added *sparkle*. The sentiment is from the set "All Holidays". I used a Chocolate Chip Stampin' Write Marker to color the word "love" only, then stamped it onto the card using a Stamp-a-ma-jig and Image Sheet for placement. The card was finished up with the use of some Chocolate Chip ribbon and three White Brads.

That's it for today, but I will see you all tomorrow with a card for the Technique Lovers Challenge. Until then.......Hugs ~ Mercy

Supplies
Stamps: She's All That, All Holidays
Papers: Soft Sky (textured), Afternoon Tea DSP, Chocolate Chip, Whisper White
Inks: Chocolate Chip
Accessories: ribbon, stamp-a-ma-jig, image sheet, brads, stickles, dimensionals, adhesive

Sunday, April 13, 2008

...Featured Stamper Challenge #62

This is my submission for today's Featured Stamper Challenge at SCS. The lucky recipient is Kharmagirl, or Jodi, to those of us who see and comment on her submissions often! She is a wonderfully talented lady with a beautiful and bubbly personality. I chose her card seen HERE to CASE making a few changes to the following: the colors, the stamp set, the ribbon, the stars, and the designer paper. I chose to keep her original layout, though. This card was so much fun to make, and I finally got to use my new hostess set, "Older & Wiser". Isn't he the cutest little turtle you have ever seen?!? I colored him using an Aquapainter and some Stampin' Write Markers. Julie Buhler has an awesome tutorial on video for this method of watercoloring that can be seen HERE...check it out!

Well that's it for now! I will be working on Beate's Weekend Sketch Challenge after church today, so if I get it finished I'll post it today. If not, I will post it with tomorrow's Technique Lovers Challenge. Thanks for stopping by! Until later....Hugs ~ Mercy

Supplies
Stamps: Older & Wiser
Papers: Old Olive, Whisper White, Not Quite Navy, Chocolate Chip, Spring Break DSP, watercolor
Inks: Jet Black Staz-On, Close to Cocoa
Accessories: sponge dauber, ribbon, large and small star punches, brads, markers, aquapainter, dimensionals, adhesive

Monday, March 3, 2008

...Inspiration Challenge #117 & Featured Stamper Challenge #56


My creation is a combination of both yesterday's Inspiration Challenge (the blue room seen above), and today's Featured Stamper Challenge at SCS. Today's lucky recipient is Mary Fish, aka Petal Pusher. Her blog, Stampin' Pretty is wonderful, and will soon be listed in my blogroll......along with several other new ones! I CASE'd her gorgeous card seen HERE, but made several changes to make it my own. I started with a card base of Whisper White cardstock measuring 11 X 4-1/4, and when folded to open at the bottom measures 5-1/2 X 4-1/4. The next layer up is made of Basic Black cardstock (5-1/4 X 4), and Bashful Blue cardstock (5-1/8 X 3-7/8). The blue panel is stamped with the "Tres Chic" background stamp in Bordering Blue Classic Ink, then both pieces were punched using the Tag Corner Punch. The next layer is Basic Black cardstock again (4 X 2) along with a strip of Cutie Pie Designer Series Paper (4 X 1-7/8). Both of these completed panels are attached to each other and the card base using SNAIL Adhesive.
The focal panel consists of Basic Black cardstock (4-1/4 X 2-1/2), Wild Wasabi cardstock (4 X 2-5/16), and Whisper White cardstock (3-3/4 X 2 ). The white cardstock was punched using the Tag Corner Punch, then stamped with the "stem" from the set "One of a Kind" in Wild Wasabi Classic Ink. The three pieces of cardstock were attached to each other using SNAIL Adhesive, Bashful Blue Brads were added to each corner, then the completed panel was attached to the card base using Dimensionals. The flowers were created by cutting twelve (12) strips of Cutie Pie Designer Series Paper that measured 2 X 1/4 with a Paper Cutter. The strips were then rolled on the ends, and six strips were used to create each flower. The strips were attached to each other in their flower pattern using Light Blue Jumbo Brads. Ice Blue KaiserScrapbook Rhinestones (see the post below to see more details on these awesome rhinestones) were added to the centers of the brads for added effect. The completed flowers were then attached to the focal panel using Mini Glue Dots. The sentiment (from "One of a Kind" also) was stamped in Black Staz-On Ink onto a 1-5/8 X 15/16 piece of Whisper White cardstock. It was then matted with Wild Wasabi cardstock (1-3/4 X 1-1/16), and Basic Black cardstock (1-7/8 X 1-3/16). To finish the card, the sentiment panel was attached to the card base using Dimensionals.
That's it for today! Thanks for stopping by, and I hope to see you tomorrow with another creation. Until then..........Hugs ~ Mercy
Supplies
Stamps: One of a Kind, Tres Chic
Paper: Basic Black, Whisper White, Bashful Blue, Wild Wasabi, Cutie Pie Designer Series Paper
Ink: Bordering Blue, Black Staz-On
Accessories: paper cutter, tag corner punch, brads, rhinestones, dimensionals, adhesive

Monday, February 18, 2008

...Featured Stamper #54

This is my submission for Sunday's Featured Stamper Challenge at SCS. The talented stamper honored was Betty (aka gbedwright). I simply adore her! She is always leaving the sweetest comments, and her creations are just awe-inspiring. I chose to CASE her card seen HERE with a few changes to make it my own. I changed the following elements: colors, punch shapes, designer papers, accessories. Even though several things were changed the fundamentals are the same and are quite obvious...and believe it or not...there is absolutely NO STAMPING!!! I started with a card base of Taken With Teal cardstock measuring 11 X 4-1/4, and when folded to open at the bottom measures 5-1/2 X 4-1/4. A piece of Regal Rose 5/8" Grosgrain Ribbon was tied around the upper portion of the card and finished in a knot.

Pieces of the following Designer Series Papers were punched out using the 1-1/4" Circle Punch: Regal Rose Prints Pack (the upper left), and Petals & Paisleys (the remaining three). Basic Black cardstock was punched four times with the 1-3/8" Circle Punch to mat each designer paper circle. The designer papers are mounted to the black mats using Dimensionals, and the completed designer panels were attached to the cardbase using Dimensionals again. A Turquoise Rhinestone was attached to the upper left panel using Tombow Mono Multi Liquid Glue. The sentiment ("thank you") is from the Cherished Memories Rub-On Pack from Stampin' Up!, and it was placed onto the lower right panel using the rub-on stick that was included with the pack.

That's it for today......easy peasy! I hope to see you all tomorrow with a Technique Lovers/Inspiration Challenge combo (the operative word is "hope"). Until then....Hugs ~ Mercy


Supplies
Stamps: NONE
Paper: Petals & Paisley Designer Series Paper, Prints Pack Designer Series Paper, Basic Black, Taken with Teal
Ink: NONE
Accessories: ribbon, liquid glue, dimensionals, punches (1-1/4" and 1-3/8"), rub-ons, rhinestone

Sunday, February 10, 2008

...Featured Stamper #53 & Big News

This is my submission for today's Featured Stamper Challenge at SCS. The lucky recipient this week is Mrs. Sarah Green. You can check out her blog HERE...she is one talented lady! I chose the card seen HERE to CASE. I changed it up a little, but kept the "bones" of the card very close to the original. I changed the following components: The colors, the stamp sets, and the embellishments (I opted for more simple accessories on mine just to be different). I started with a card base of Summer Sun cardstock that measured 10 X 5, and when folded to open at the bottom measures 5 X 5. The next layer up is Old Olive cardstock that measures 4-7/8 X 4-7/8, and it was stamped with "Flannel Plaid" in Old Olive Classic Ink.

The focal panel consists of the following: Real Red cardstock (5 X 2-1/2), Summer Sun cardstock(5 X 2-3/8), and Watercolor Paper (5 X 2-1/4). All of the layers were attached to each other and the card base using SNAIL Adhesive. Several stamps were used to make this creation, but all of the images were stamped in Staz-On Black Ink, then each was colored using Derwent Studio Colour Pencils, Blending Stumps, and Mineral Spirits. The truck from the set "Loads of Love" was stamped twice...once onto the focal panel, then again on a scrap piece of watercolor paper. The one stamped onto the scrap piece was colored and allowed to dry. The driver and puppy passengers from the set "Loads of Love Accessories" were stamped using a Stamp-a-ma-jig and Image Sheet onto the focal panel, then colored also. The colored truck image was cut out using CutterBee Scissors, then layered over the image on the focal panel using Dimensionals. The puppies following behind the truck are from the "Tailgating" Standard Wheel. They were also stamped onto watercolor paper, colored, and attached to the focal panel using Dimensionals. The sentiment "friends for the long haul" (also from the accessories set) was stamped in Always Artichoke Classic Ink in the lower right corner of the card, then Real Red Brads and Summer Sun Brads were added to the top left corner of the card with the use of a Mat Pack and Paper Piercer. Shadows were added under each image to add a little more depth and to finish off this simple card.


Now for some BIG NEWS...my oldest son, Christian has been recruited to play basketball for the Chattanooga Panthers! We were approached a week ago by the head coach of the AAU (Amatuer Athletics Union) team about him becoming a member. I attended my first parent meeting today in order to get all of the details regarding practices, schedules, fees, fundraisers, etc. I met some wonderful, sweet, and welcoming mothers who made me feel like a part of their circle an less like an outsider. I also got to meet the two assistant coaches that would be working one-on-one with him. I am so excited that my son has this opportunity...he will be playing with and facing the best of the best. Not only that, but he will also be watched and ranked by college scouts......can you say "scholarships"? I think it means so much more due to the fact that this was his first year playing basketball! He had played when he was five and six on my husband's recreation team, but has never played on a school team until this past November. Boy has he come a LONG way!!! Our first tournament is in two weeks, and there will be alot of practices between now and then (so I may not be posting as often as I would like. Please be patient with me).


Not only have I been impressed with Christian's talent, but I have been equally impressed with the cooperative and encouraging spirit of his middle school coach, Derek Smith. I received this touching text message from him this afternoon: "Christian's progression in basketball for just one season is uncanny. Let me know if he needs a reference for AAU. I will be willing to open up the gym on the weekends and work with him if he wants". It's coaches like him that make the biggest impressions on these young yet growing boys. Even after their season has ended, this coach is willing to work with and speak for one of his players. I am so thankful that he has had the chance to play and learn so much in one season. Thank you, Coach Smith! Needless to say, I think that he has found his niche! He has already told his dad and me that he doesn't even want to play football next year in high school, because he wants to focus on and train for basketball. It now looks like basketball has become a ten month stint for us......but I think we can handle it!

Thanks for stopping by today, and sharing this happy and crazy time with me! I will see you all later! Until then.....Hugs ~ Mercy

Supplies
Stamps: Loads of Love, Loads of Love Accessories, Flannel Plaid, Tailgating Standard Wheel
Paper: Summer Sun, Old Olive, Real Red, Watercolor
Ink: Staz-On Black, Always Artichoke, Old Olive
Accessories: colour pencils, blending stumps, mineral spirits, scissors, dimensionals, brads, adhesive

Sunday, January 13, 2008

...Featured Stamper #49 ~ Veronica McCollum

This is my submission for today's Featured Stamper Challenge #49. The lucky recipient is Veronica McCollum (aka I'mVeronica at SCS). Her gallery can be seen HERE, and her blog can be seen HERE. She is a young little thing, and she's also an SU demonstrator. Congratulations, Veronica...you do some wonderful work! I chose to CASE her card seen HERE, but changed a couple of things to make it my own. I changed the following elements of her card: the layout, the embellishments, and some of the accessories. The elements that remained the same were the colors, the stamp set, and the punch used.

I started with a card base of Wild Wasabi cardstock that measures 11" X 4-1/4", and when folded to open at the right measures 5-1/2" X 4-1/4". It was stamped with "Canvas" in Wild Wasabi Classic Ink. The left panel consists of More Mustard cardstock (3-3/4" square), and Ruby Red cardstock (3-5/8" square) stamped with "Tres Chic" in Ruby Red Classic Ink. The edges are distressed using Heidi Swapp's Distressing Tool, and the sides are pierced using a Mat Pack and Paper Piercer. The layers are attached to each other using SNAIL Adhesive. The center panel consists of More Mustard cardstock (3-7/8" X 3-1/8"), and Whisper White cardstock (3-3/4" X 3"). Several stamps from the set "Office Accoutrement" were stamped onto the white paper in the following colors: More Mustard Classic Ink (the large and small flowers), Wild Wasabi Classic Ink (the memo journal), and Ruby Red Classic Ink ("daily notes"). The Spiral Punch was used to punch the top edge of the white cardstock to make it look like a piece of stationery, then the edges were sponged in wasabi ink using a Sponge Dauber. The layers were attached to each other using SNAIL Adhesive also. All of the panels were attached to the card base using the same adhesive.

The large flower from the same set was stamped twice onto white cardstock: once in wasabi, and again in ruby. The small flower was also stamped onto a scrap piece of white cardstock in mustard. Each of the three flowers were cut out using CutterBee Scissors, then each was layered on top of the other using Dimensionals. A Medium Mustard Rhinestone was added to the center of the small mustard flower with a Mini Glue Dot, and the layered flower was attached to the card base using Dimensionals.

That's it for today! I fell asleep pretty early last night, so as a result, I woke up quite early this morning. I'm kinda glad I did, though...that gave me a chance to make a card and post it before we left to go to church! Thanks for stopping by to visit me, and I will see you all tomorrow with a card for the Technique Lovers' Challenge. Until then.....Hugs ~ Mercy

Supplies
Stamps: Office Accoutrement, Canvas, Tres Chic
Paper: Ruby Red, Wild Wasabi, More Mustard, and Whisper White
Ink: same as paper
Accessories: mat pack, paper, piercer, sponge dauber, distressing tool, adhesive, scissors, mini glue dots, dimensionals, spiral punch, rhinestone

Sunday, January 6, 2008

...Featured Stamper #48 & Beate's Weekend Sketch Challenge #20

This is my submission for today's Featured Stamper Challenge at SCS. Today's lucky lady of honor is Nancy Riley (aka stampinat6213 at SCS)...love, love, love her creations! Her original card that inspired me can be seen HERE. She also has a phenomenal blog called iStamp. Her card was a submission for Beate's Weekend Sketch Challenge also, so I had to include those keywords, too. I kept the same card sketch, but changed the colors and the chipboard accent. Before I ever cut my cardstock, I chose to use a Chipboard Heart from the On Board Accents collection from Stampin' Up to make a Valentine's Day card. I used Black Diamond Stickles to coat the entire heart, then used my Heat Gun to dry it quickly. When a heat gun is used the the pieces of glitter actually melt to create a glossy and glittery sheen. When it had dried completely, I then used some Christmas Red Stickles to spread over the dried black heart. I simply squeezed some out in the middle and used my finger to spread the stickles out all over the heart, and then allowed that layer to air dry.

The card base is Real Red cardstock measuring 10-1/2" X 5-1/4", and it was folded in half to open at the right and measure 5-1/4" square. The panels are made up of Basic Black cardstock and BasicGrey's Scarlet's Letter collection. The first layer up from the bottom measures 4-3/4" X 2-3/4" with the designer paper cut at 4-5/8" X 2-5/8". The other two square panels are 3-1/4" square with the designer paper cut at 3-1/8" square. The layers of each panel are attached to each other using SNAIL Adhesive. The sentiment on the bottom square panel is from the set "Wonderful Words", and was stamped in VersaMark along the bottom of the panel. It was then embossed using Black Embossing Powder and a Heat Gun. A piece of Black Organdy Ribbon was tied around the top section of the sentiment panel, and finished in a simple knot. The two lowest layers were attached to the card base using SNAIL Adhesive, but the top panel was popped up off of them with some help from some Dimensionals. The Chipboard Heart was then attached to the top panel using Dimensionals, too.

That's it for today! Thanks for coming by to see me, and I hope to see you tomorrow with a card for the Technique Lovers' Challenge. Until then...Hugs ~ Mercy!

DON'T FORGET TO ENTER TO WIN THE BLOG CANDY IN THE POST BELOW. THE DRAWING WILL BE TOMORROW AT 5:00 PM (EST)!

Supplies

Stamps: Wonderful Words

Paper: Real Red, Basic Black, Scarlet's Letter (BasicGrey)

Ink: VersaMark

Accessories: stickles, heat gun, chipboard heart, adhesive, dimensionals, ribbon

Sunday, December 2, 2007

...Featured Stamper Challenge #43 ~ CuttersCallous

This is my submission for today's Featured Stamper Challenge at SCS. The lucky lady we honor and CASE (Copy And Share with Everyone) is RoseAnn.......aka CuttersCallous. She is a phenomenally talented card maker with a clean and crisp design style. I chose THIS CARD of hers to copy, but changed several elements to make it my own. Here is a list of the things I've changed: the color of cardstock, the stamp set, the ribbon, the embellishments. I kept the same layout, however, and I believe I still kept her vision in tact. So let's get on to the deets (details)!

I began with a card base of Kraft cardstock measuring 4" X 8". It is folded in half to make a 4" square card that opens from the bottom. I used one of my Square Dry Embossing Templates, an Embossing Stylus, and my Light Box to deboss the center of the front of the card to make it look like a frame. The flower and the sentiment are from the set "Time Well Spent". This set was sent to demonstrators as a thank you from Stampin' Up! It will be in the new Spring-Summer Catalog as a hostess set (Pam V....see what you did? You made me use this set! teehee!). Both of the elements were stamped in Staz-On Opaque White ink. I colored the outer outline with my White Uni-Ball Signo Gel Pen, then traced over the sentiment to make it a bit brighter.

I then used the 3/4" Circle Punch to punch out a scrap piece of kraft cardstock to cover the center of the flower. Before I covered it, I attached a Jumbo Glittering Red Rhinestone Brad to the middle of the circle, and used Dimensionals to pop it up off of the flower. Christmas Red Stickles were applied to the stamen of the large flower and the centers of the flowers in the sentiment. I added 1/4" Red Grosgrain Ribbon to the top of the fold by punching out one hole at each end with the 1/16" Handheld Punch. The ribbon is finished off in a simple knot.

That's it for today! Thanks for stopping by to check out my artwork! I hope to see you again tomorrow with a creation for the Technique Lovers Challenge. Until then.......Hugs ~ Mercy

Supplies
Stamps: Time Well Spent
Paper: Kraft
Ink: Staz-On Opaque White
Accessories: signo gel pen, dimensionals, 3/4" circle punch, 1/16" handheld punch, rhinestone brad, grosgrain ribbon, stickles, dry emboss template, light box, stylus